Stripe Setup
Important: Stripe account connection is currently enabled member-by-member and is not fully released. If you'd like to connect your Stripe account to accept payments, please contact support and we can enable this feature for your account.
Connecting your Stripe account allows you to accept payments from subscribers and supporters on LavishMade. Once your Stripe account is connected and verified, you can receive payments for paid subscriptions and Creator Support directly to your bank account.
Requesting Stripe Access
Since Stripe connection is currently enabled member-by-member:
- Contact support through our help center
- Let us know you'd like to connect your Stripe account to accept payments
- We'll enable Stripe connection for your account
- Once enabled, you can follow the steps below to connect your Stripe account
How to Connect Your Stripe Account
Once Stripe connection is enabled for your account, you can connect your Stripe account:
- Go to your Publishing Settings (you can find this in your account settings)
- Look for the "Payment Processing" section
- Before clicking "Connect to Stripe", copy your profile URL or blog URL (see below for details)
- Click "Connect to Stripe" - you'll be redirected to Stripe's secure onboarding page
- Complete Stripe's account setup process step by step (detailed below)
- Once you complete Stripe's onboarding, you'll be redirected back to LavishMade
- Your Stripe account will be connected and ready to accept payments
Step-by-Step Stripe Onboarding Process
Here's what you'll be asked during the Stripe connection process:
Step 1: Select Bank Account for Payouts
Stripe will ask you to link your bank account to receive payouts:
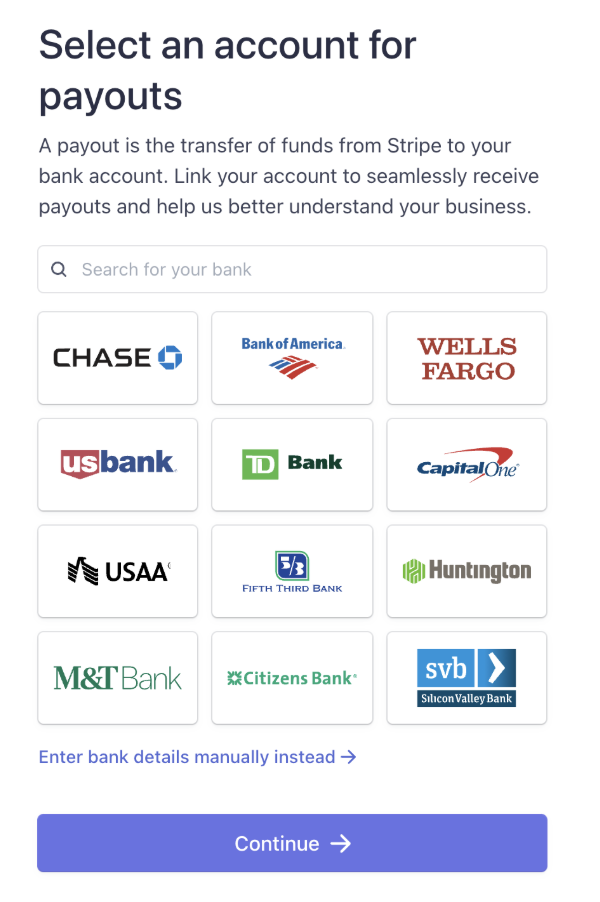
- You'll see a search bar to search for your bank
- Popular banks are displayed in a grid (Chase, Bank of America, Wells Fargo, etc.)
- You can click on your bank from the grid, or search for it
- Alternatively, you can click "Enter bank details manually instead" if your bank isn't listed
- Click "Continue" once you've selected your bank
Step 2: Personal Details
You'll need to provide personal information:
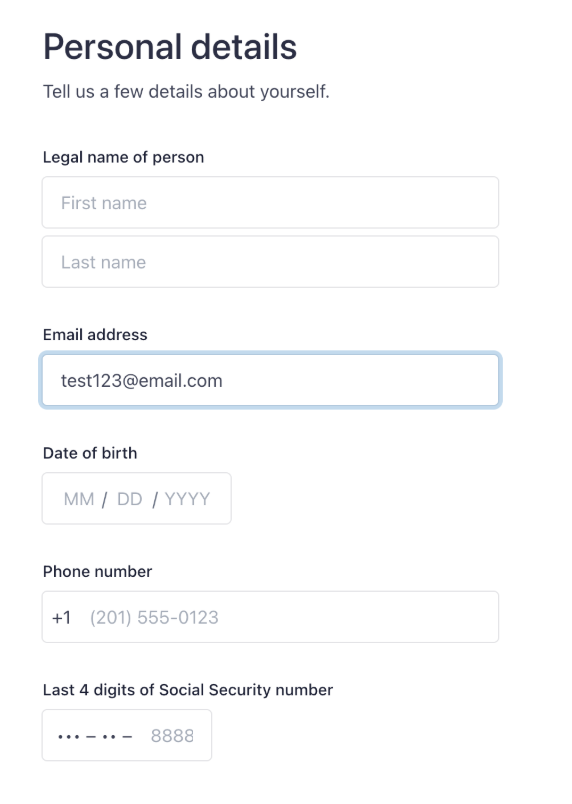
- Legal name of person: Enter your first name and last name (as they appear on your legal documents)
- Email address: This will be pre-filled with your LavishMade email address
- Date of birth: Enter your date of birth in MM/DD/YYYY format
- Phone number: Enter your phone number (this may be pre-filled)
- Last 4 digits of Social Security number: Enter the last 4 digits of your SSN for verification
All of this information is required for identity verification and tax purposes. Stripe handles this information securely and in compliance with financial regulations.
Step 3: Customer Support Details
Stripe will ask for customer support information that may appear on payment statements:
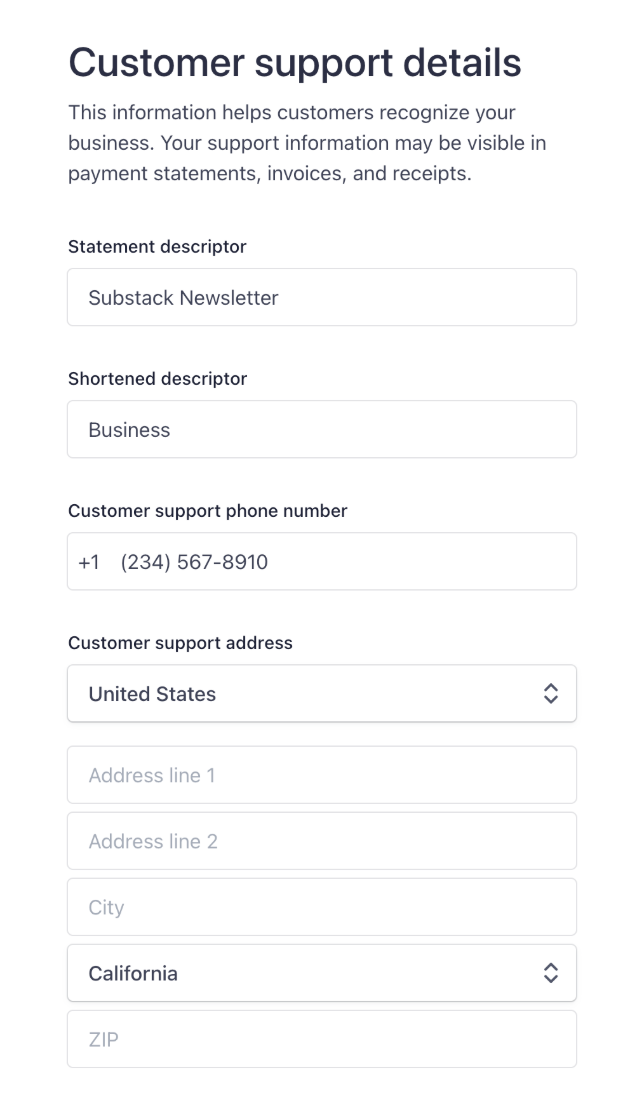
- Statement descriptor: This is what appears on credit card statements. You can use something like "LavishMade" or your display name
- Shortened descriptor: A shorter version for statements with limited space (e.g., "Business")
- Customer support phone number: A phone number where customers can reach you (optional but recommended)
- Customer support address: Your business or personal address:
- Country (dropdown - select United States)
- Address line 1 (your street address)
- Address line 2 (optional - apartment, suite, etc.)
- City
- State (dropdown - select your state)
- ZIP code
- Website address: Important: If you have your own website, enter it here. If you don't have a website, use your LavishMade profile URL or blog URL:
- Profile URL format:
lavishmade.com/u/yourusername - Blog URL format:
lavishmade.com/u/yourusername/blog - You can copy your URL from the Publishing Settings page before starting the connection process
- Profile URL format:
Step 4: Additional Verification (If Required)
Depending on your account type and location, Stripe may ask for additional information:
- Business information (if you're setting up as a business)
- Tax identification number (EIN for businesses, SSN for individuals)
- Identity verification documents (photo ID, etc.)
- Bank account verification (may require micro-deposits)
Step 5: Review and Complete
After providing all required information:
- Review all the information you've entered
- Stripe will process your application
- You'll be redirected back to LavishMade
- Your account status will be shown in Publishing Settings
Preparing Your Website URL
Before starting the Stripe connection process, you'll want to have your website URL ready:
- If you have your own website: Use that URL
- If you don't have a website: Use your LavishMade profile URL or blog URL:
- Your profile URL:
lavishmade.com/u/yourusername - Your blog URL:
lavishmade.com/u/yourusername/blog
- Your profile URL:
- Copy your URL: In Publishing Settings, you'll see a section with your profile and blog URLs that you can easily copy before connecting to Stripe
- Why this matters: This URL may appear on payment statements and helps Stripe understand your business
Stripe Account Requirements
To connect your Stripe account, you'll need:
- Valid Email Address: The email address associated with your LavishMade account
- Business or Personal Information: Depending on your account type, you'll need to provide business details or personal information
- Bank Account: A valid bank account where you want to receive payments
- Tax Information: Required tax information for payment processing (Stripe handles this securely)
- Identity Verification: Stripe may require identity verification depending on your location and account type
Account Verification
After connecting your Stripe account, it may need to be verified:
- Verification Process: Stripe will review your account information and may request additional documentation
- Verification Time: Verification typically takes a few business days, but can vary
- Status Updates: You'll receive notifications about your account verification status
- Pending Status: While verification is pending, your subscription tiers will be set up but won't be able to accept payments yet
- Active Status: Once verified and charges are enabled, you can start accepting payments immediately
What You Can Do After Connecting
Once your Stripe account is connected and verified, you can:
- Accept Paid Subscriptions: Set up paid subscription tiers (Monthly, Yearly, Founding Member) and receive recurring payments
- Receive Creator Support: Accept one-time support payments from your audience on posts and blogs
- Host live ticketed streams: Sell tickets to live video events once Connect can charge cards. See Hosting live stream events
- Manage Payouts: Receive payments directly to your connected bank account
- View Earnings: Track your earnings and payment history through your account
- Set Pricing: Configure your subscription tier prices and manage your monetization settings
Stripe Account Types
LavishMade uses Stripe Express accounts, which are designed for platforms like ours:
- Express Accounts: Simplified setup process designed for creators and small businesses
- Platform Integration: Seamlessly integrated with LavishMade's payment system
- Automatic Payouts: Payments are automatically transferred to your bank account
- Secure Processing: All payments are processed securely through Stripe's infrastructure
Managing Your Stripe Connection
You can manage your Stripe account connection:
- View Status: Check your Stripe connection status in Publishing Settings
- Update Information: Update your Stripe account information through Stripe's dashboard (you'll be redirected there)
- Disconnect: You can disconnect your Stripe account, but you must cancel all active paid subscriptions first
- Reconnect: You can reconnect your Stripe account at any time if you disconnect it
Payment Processing and Fees
Understanding how payments work:
- Platform Fees: LavishMade charges a platform fee on payments (this helps support the platform)
- Stripe Fees: Stripe charges standard processing fees (typically 2.9% + $0.30 per transaction)
- Net Amount: You receive the payment amount minus platform and processing fees
- Automatic Transfers: Payments are automatically transferred to your connected bank account
- Payout Schedule: Payouts are typically processed on a regular schedule (Stripe handles this)
Troubleshooting
If you encounter issues connecting your Stripe account:
- Contact Support: If you're having trouble, contact our support team for assistance
- Verification Issues: If verification is taking longer than expected, check your email for any requests from Stripe
- Account Errors: If you see errors during setup, try refreshing the page or starting the connection process again
- Missing Information: Make sure you've completed all required fields in Stripe's onboarding process
Security and Privacy
Your payment information is secure:
- Stripe Security: All payment processing is handled securely by Stripe, a PCI-compliant payment processor
- Encrypted Data: Your financial information is encrypted and never stored on LavishMade's servers
- Secure Connection: All Stripe connections use secure, encrypted connections
- Privacy: Your payment information is only shared with Stripe for payment processing purposes
Tip: Connecting your Stripe account opens up new monetization opportunities on LavishMade. Once connected and verified, you can start accepting paid subscriptions and Creator Support payments. Remember, if you don't see the option to connect Stripe in your settings, contact support to have this feature enabled for your account.